By Matthew Millar R&D Scientist at ユニファ
This blog will be looking at how to set up and start a Hadoop server on windows as well as give some explanation as to what it is used for.
What is Hadoop:
Hadoop is a set of tools that can be used for easy processing and analyzing Big Data for a company and research. Hadoop gives you tools to manage, query, and share large amounts of data with people who are dispersed over a large geographical location. This means that teams in Tokyo can easily work with teams in New York, well not accounting for sleeping preferences. Hadoop gives a huge advantage over a traditional storage system, not only in the total amount of storage possible, but in flexibility, scalability, and speed of access to this data.
Modules
Hadoop is split up into 4 distinctive modules. Each module performs a certain task that is needed for the distributed system to function properly. A distributed system is a computer system that has its components separated over a network of different computers. This can be both data and processing power. The actions of the computers are coordinated by messages that are passed back and forth between each other. These systems are complex to set up and maintain but offer a very powerful network to process large amounts of data or run very expensive jobs quickly and efficiently.
The first module is the Distributed Filesystem. The HDFS allows files to be stored, processed, shared and managed across a set of connected storage devices. HDFS is not like a regular operating file system and normally can be accessed by any supported OS which gives a great deal of freedom.
The second module is MapReduce. There are two main functions that this module performs. Mapping is the act of reading in the data (or gathering it form each node). Mapping then puts all this data into a format that can be used for analysis. Reduce can be considered the place where all the logic is performed on the collected data. In other words, Mapping gets the data, Reducing analyzes it.
Hadoop common is the third module. This module consists of a set of Java tools that each OS needs to access and read the data that is stored in the HDFS.
The final module is YARN which is the system management that manages the storing of the data and running of task/analysis of the data.
Little More Detail:
What is a namenode? A namenode stores all the metadata of all the files in the HDFS. This includes permissions, names, and block locations. These blocks can be mapped to each datanode. The namenode is also responsible for managing the datanode, i.e. where it is saved, which blocks are on which node, etc…
A datanode, aka a slave node, is the node that actually stores and retrieves blocks of information requested by the namenode.
Installation:
Now with the background out of the way lets try to install the system on Windows 10.
Step 1: Download Hadoop Binaries from here
Apache Download Mirrors
Step 2: Make its own folder in the C drive to keep things tidy and make sure that it is easy to find.
NOTE DO NOT PUT ANY SPACES AS IT CAN CAUSE SOME VARIABLES TO IMPROPERLY EXPAND.

Step 3: Unpack the tar.gz file (I suggest 7 zip as it works on windows and is free)
Step 4: To run it on Windows, you need a windows compatible binary from this repo
https://github.com/ParixitOdedara/Hadoop. You can just download the bin folder and copy all the files from the downloaded bin to Hadoop's bin (replace any files if needed). Simple right.
Step 5: Create a folder called data and, in this folder, create two others called datanode and namenode. The datanode will hold all the data that is assigned to it. The namenode is the master node which holds the metadata for the datanode (i.e. which data node the 64mb blocks is located on)

Step 6: Set up Hadoop Environment variables like so:
HADOOP_HOME=”C:\BigData\hadoop-2.9.1\bin”
JAVA_HOME=<Root of your JDK installation>”
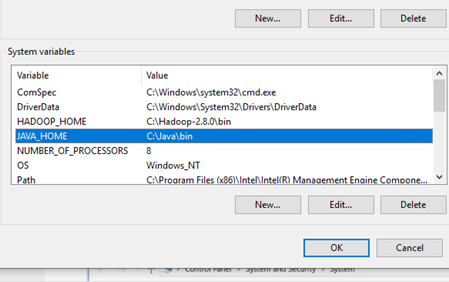
And add it to your path variables like this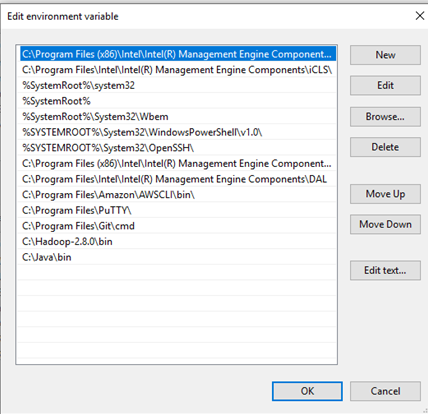
Step 7: Editing several configuration files.
First up is the:
Ect\hadoop\hadoop-env.cmd
set HADOOP_PREFIX=%HADOOP_HOME%
set HADOOP_CONF_DIR=%HADOOP_PREFIX%\etc\hadoop
set YARN_CONF_DIR=%HADOOP_CONF_DIR%
set PATH=%PATH%;%HADOOP_PREFIX%\bin
Next, let's look at:
Ect\hadoop\core-site.xml
<configuration>
   <property>
     <name>fs.default.name</name>
     <value>hdfs://0.0.0.0:19000</value>
   </property>
</configuration>
Then the ect\hadoop\hdfs-site.xml
<configuration>
   <property>
      <name>dfs.replication</name>
      <value>1</value>
   </property>
   <property>
      <name>dfs.namenode.name.dir</name>
      <value>C:\BigData\hadoop-2.9.1\data\namenode</value>
   </property>
   <property>
      <name>dfs.datanode.data.dir</name>
      <value>C:\BigData\hadoop-2.9.1\data\datanode</value>
   </property>
</configuration>
And now the:
Ect\hadoop\mapred-site.xml
<configuration>
   <property>
      <name>mapreduce.job.user.name</name>
      <value>%USERNAME%</value>
   </property>
   <property>
      <name>mapreduce.framework.name</name>
      <value>yarn</value>
   </property>
   <property>
      <name>yarn.apps.stagingDir</name>
      <value>/user/%USERNAME%/staging</value>
   </property>
   <property>
      <name>mapreduce.jobtracker.address</name>
      <value>local</value>
   </property>
</configuration>
Running Hadoop
On the first time you start up you need to run I a cmd write:
Hadoop namenode -format
This set up your namenode and gets Hadoop running.
Now cd into your sbin folder and type
start-all.cmd
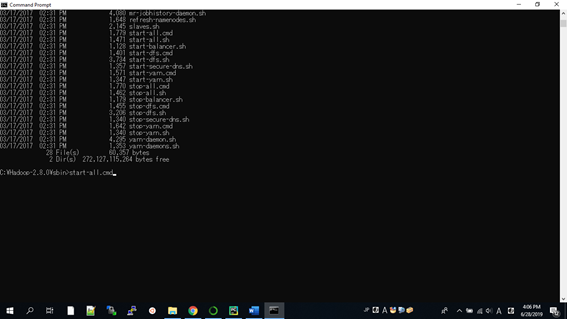
This will open up 4 other screens like this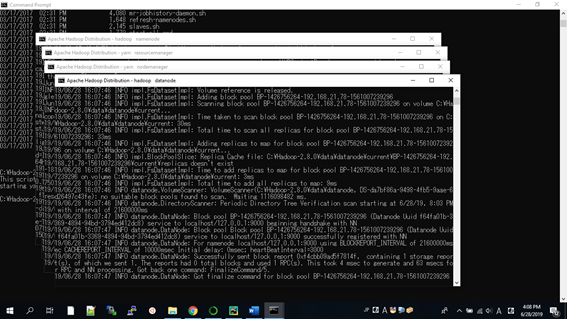
Their names are; namenode, datanode, nodemanager, and resourcemanager.
And now we can look at Hadoop in a browser
The resource manager is
http://localhost:8088/cluster/cluster
This is what you should be greeted with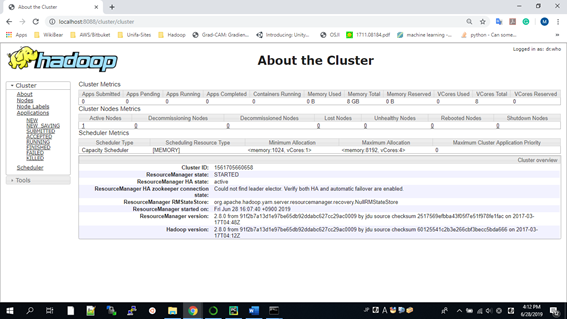
Here are the links for the; node manager, datanode, and a manager for Hadoop.
http://localhost:8042/node
http://localhost:50070/dfshealth.html#tab-overview
http://localhost:50075/datanode.html
Working with Hadoop
Now we can finally start to work or using Hadoop after all this set and configuration.
Open a cmd
To insert data into the HDFS use the following
fs -mkdir /user/input
fs -put /home/file.txt /user/input
fs -ls /user/input
To retrieve the Data from HDFS use the following
fs -cat /user/output/outfile
fs -get /user/output/ /home/hadoop_tp/
And finally shut down the system.
stop-dfs.sh
And that’s it, we managed to install and use Hadoop. Now this is a very simple way of doing it and there may be better approaches like using Dockers, or commercial versions which are much easier to use and setup, but learning how to set it up and run it from scratch is a good experience.
Conclusion
We learned that it was very complex to set up and configure all of Hadoop. But with all the power it can bring to Big Data analysis as well as large data sets that are used for AI training and testing, Hadoop can be a very powerful tool in any researcher, data scientist, and business intelligence analyst.
A potential use of Hadoop form image analysis where you have images that are stored in different sources or if you want to use a standard set of images, but the number of images is too large to store locally in a traditional storage solution. Using Hadoop, one can establish a feeding reducer that can then be used in a data generator method in a Keras model. The potentially one can have an endless stream of data from an extremely large dataset, thus giving almost unlimited data. This approach can also be used to get numerical data that is stored on a Hadoop system. Now you do not have to download the data directly just use Hadoop to query and do preprocessing of the data before you feed it into your model. This can save time and energy when working with distributed systems.