こんにちは、データエンジニアリングチームの宮崎です。この記事は、UniFaアドベントカレンダー2020の21日目の記事となります。 最近、文字を自由に編集できるLINEスタンプがあることを知りました。いつの間にか色々進化していますね・・・! そこで今回はDeepLearningのモデルを使って、以下のように写真からLINEスタンプ風画像の自動作成を行ってみたいと思います。

処理の流れ
今回のスタンプ風画像の自動生成では顔検出、感情推定、セマンティックセグメンテーションの3つの手法を使います。 セマンティックセグメンテーションとは少し聞き慣れない言葉ですが、入力画像の各ピクセルごとに、人や車などどのラベルに属するか推定する手法です。これらの各手法を以下の流れで組み合わせることで、生成していきます。

上から順に流れを追いますと、まず顔検出で写真全体の中から顔画像を切り出します。次に切り出された顔領域に対し、感情推定とセマンティックセグメンテーションを行います。 セマンティックセグメンテーションから人物領域およびそれ以外の領域に分けたマスク画像を生成します。 最後に先ほどの顔画像と背景画像をマスク画像を元に合成し、感情推定結果のテキストを挿入して完成です。
顔検出・感情推定
顔検出および感情推定については自前でDeepLearningのモデルを使うのも良いですが、今回は手軽に推論できるAWS Rekognitionを使用します。
import boto3
import numpy as np

# こちらのバケットに保存された画像から200x200のスタンプ風画像を生成します
S3_BUCKET = 'bucket-name'
S3_KEY = 'path/to/image.jpg'
STAMP_SIZE = 200

def detect_faces(client, s3_bucket, s3_key):
    # Rekognitionの顔検出
    resp = client.detect_faces(
        Image={'S3Object':{'Bucket':s3_bucket,'Name':s3_key}},
        Attributes=['ALL'])

    # Rekognitionの結果から顔座標と感情を取得
    faces = []
    for f in resp['FaceDetails']:
        # Confidenceが最大のEmotionsを取得します
        emotion_types = []
        emotion_confidences = []
        for emo in f['Emotions']:
            emotion_types.append(emo['Type'])
            emotion_confidences.append(emo['Confidence'])
        emotion = emotion_types[np.argmax(emotion_confidences)]

        face = {
            'top': f['BoundingBox']['Top'],
            'left': f['BoundingBox']['Left'],
            'height': f['BoundingBox']['Height'],
            'width': f['BoundingBox']['Width'],
            'emotion': emotion
        }
        faces.append(face)

    return faces

session = boto3.Session()
rekognition_client = session.client('rekognition')
faces = detect_faces(rekognition_client, S3_BUCKET, S3_KEY)
Rekognitionから以下の顔座標と感情ラベルを得ることができました。
[
  {
    'top': 0.09833097457885742,
    'left': 0.4869999289512634,
    'height': 0.3153861463069916,
    'width': 0.20403644442558289,
    'emotion': 'HAPPY'
  }
]
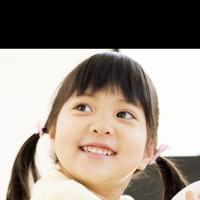
続いて、使用した入力画像をダウンロードして、得られた顔画像を切り抜きます。 切り抜き時はRekognitionの座標よりも少し広めにとりつつ、上部に文字を入れるために顔が若干下の位置になる様にします。
import io
from PIL import Image

def download_image(client, s3_bucket, s3_key):
    s3_object = s3_client.get_object(Bucket=s3_bucket, Key=s3_key)
    image_data = io.BytesIO(s3_object['Body'].read())
    image = Image.open(image_data).convert('RGB')
    return image

def crop_faces(image, faces, scale=2.0):
    iw, ih = image.size
    face_images = []
    for face in faces:
        top = face['top'] * ih
        left = face['left'] * iw
        bh = face['height'] * ih
        bw = face['width'] * iw

        # 少し広めのサイズにし、顔が上下は下側、左右は中心に来るようにします
        target_size = max(bh, bw) * scale
        top = int(top - (target_size - bh) * 0.8)
        left = int(left - (target_size - bw) * 0.5)
        bottom = int(top + target_size)
        right = int(left + target_size)

        face_image = image.crop((left, top, right, bottom))
        face_image = face_image.resize((STAMP_SIZE, STAMP_SIZE))
        face_images.append(face_image)

    return face_images

s3_client = session.client('s3')
image = download_image(s3_client, S3_BUCKET, S3_KEY)
face_images = crop_faces(image, faces)
こちらが切り抜いた顔画像です。上の方は入力画像の外側となるため、黒くなっています。これで顔検出および、顔推定ができました!
セマンティックセグメンテーション
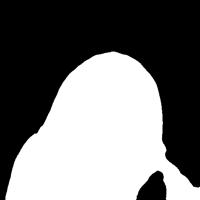
続いて、得られた顔画像からセマンティックセグメンテーションを使用してマスク画像を作成します。今回はDeepLab*1という手法のKeras実装モデル*2を使用します。なお動作環境はTensorFlow 2.3です。
まず始めにDeepLabのリポジトリをクローンしてきます。
$ git clone https://github.com/bonlime/keras-deeplab-v3-plus.git
続いてマスク画像の作成です。今回はDeepLabモデルのうち、バックボーンがXception*3で、Pascal VOCデータセット*4による事前学習済みモデルを使用します。 Pascal VOCでは、15がpersonを表すラベルのため、該当するピクセルを255, それ以外を0に置き換えます。
import sys

sys.path.append('/path/to/keras-deeplab-v3-plus/')
from model import Deeplabv3

def predict_mask(deeplab_model, image):
    trained_image_width = 512
    mean_subtraction_value = 127.5

    # リサイズ
    w, h = image.size
    ratio = float(trained_image_width) / np.max([w, h])
    resized_image = np.array(
        image.resize((int(ratio * w), int(ratio * h))))

    # 値を正規化
    resized_image = (resized_image / mean_subtraction_value) - 1.

    # 正方形にするためにパディング
    pad_x = int(trained_image_width - resized_image.shape[0])
    pad_y = int(trained_image_width - resized_image.shape[1])
    resized_image = np.pad(
        resized_image, ((0, pad_x), (0, pad_y), (0, 0)),
        mode='constant')

    # セマンティックセグメンテーション
    res = deeplab_model.predict(np.expand_dims(resized_image, 0))
    labels = np.argmax(res.squeeze(), -1)

    # パディング除去
    if pad_x > 0:
        labels = labels[:-pad_x]
    if pad_y > 0:
        labels = labels[:, :-pad_y]

    # personの15をmask用に255に変換
    mask = np.where(labels==15, 255, 0).astype('uint8')
    mask = Image.fromarray(mask).resize((w, h))

    return mask

def generate_mask_images(face_images):
    deeplab_model = Deeplabv3(
        weights='pascal_voc', backbone='xception')
    mask_images = []
    for face_image in face_images:
        mask = predict_mask(deeplab_model, face_image)
        mask_images.append(mask)
    return mask_images

mask_images = generate_mask_images(face_images)
これでマスク画像ができました!
画像の合成
最後に仕上げとして、顔画像と背景画像を合成し、推定した感情ラベルを挿入したいと思います。 今回は楽をして、背景画像には水色一色の画像を作成しました。
from PIL import ImageDraw, ImageFont

def generate_stamps(face_images, mask_images, faces):
    font = ImageFont.truetype('Chalkduster.ttf', 40)
    label_top = 10

    stamps = []
    for face_image, mask, face in zip(
        face_images, mask_images, faces):
        background = Image.new(
            'RGB', face_image.size, (204,255,255))
        stamp =  Image.composite(face_image, background, mask)
        draw = ImageDraw.Draw(stamp)
        label = face['emotion']
        w, h = face_image.size
        label_size = draw.textsize(label, font)
        label_left = (stamp.width - label_size[0]) // 2
        draw.text((label_left,label_top), label,
                  font=font, fill=(255, 100, 100))

        stamps.append(stamp)

    return stamps

stamps = generate_stamps(face_images, mask_images, faces)
無事にスタンプ風画像ができました!クレヨン風のフォントがいい感じです。残念ながら、同じフォントがない環境の場合は他のものに差し替えていただければと思います。

最後に
いかがだったでしょうか。顔検出・感情推定・セマンティックセグメンテーションの3つの手法を組み合わせて、LINEスタンプ風画像を作ってみました。 今回は背景に水色一色の画像を用いましたが、デザイン性のあるものを使えば、もっとクオリティが上がるのではないかと思います。 DeepLearningには面白いモデルがいろいろあるので、活用できる用途を見つけていきたいと思います。