By Patryk Antkiewicz, backend engineer at Unifa.
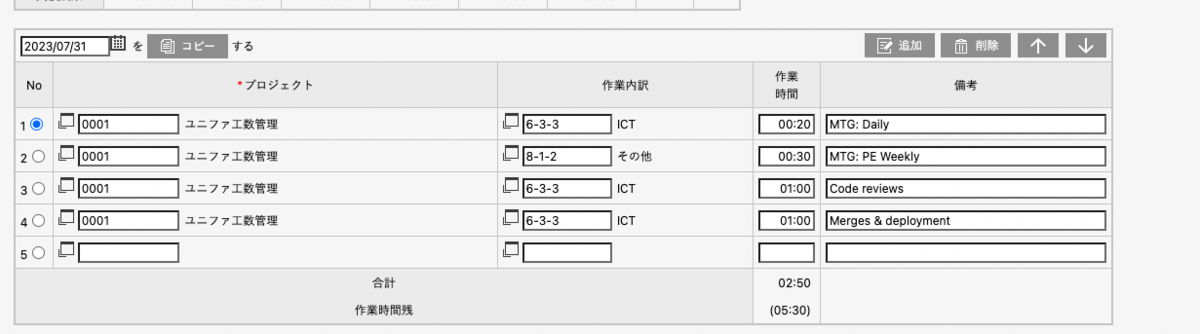
Unifa uses a web application called OZO for work time tracking, which requires us to input tasks we worked on each day and time spent on them. Tasks can be selected from the list or filled manually using specific codes. For engineers the inputs are quite similar each day, there are also some recurring meetings, so filling such reports manually every day becomes a bit tedious task. The codes also change depending on the project we are currently working so remembering the correct ones is sometimes problematic. I thought it would make the whole process much more convenient if I had some kind of cache containing my 'favorite' inputs which I could inject into OZO with one click, so I decided to create a tool that I could use for that purpose.
The idea was as follows: create a simple Chrome extension (popup) which will allow me to add and remove ‘favorite’ work inputs and store them in some sort of persistent cache. Then when I open OZO, I wanted to be able to insert them into the DOM by single click. I chose to use Vue 3 with Typescript for the popup implementation, since it is the stack I am most familiar with.
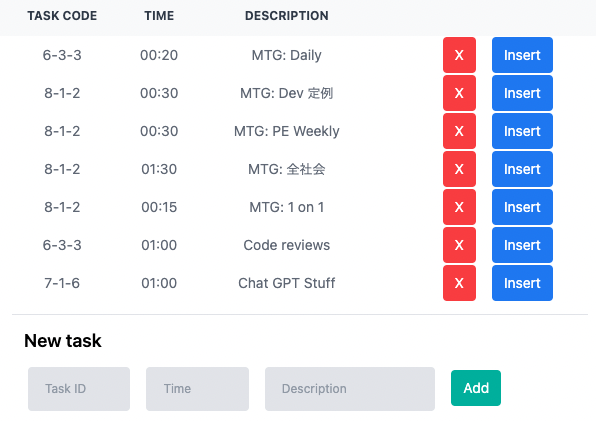
My goal was to build a popup which looks as below:
Project initial setup
I created new project using Vite, and chose Vue and Typescript. I called the project ozo-helper
$ yarn create vite
yarn create v1.22.19
[1/4] 🔍  Resolving packages...
[2/4] 🚚  Fetching packages...
[3/4] 🔗  Linking dependencies...
[4/4] 🔨  Building fresh packages...
success Installed "create-vite@4.4.1" with binaries:
      - create-vite
      - cva
✔ Project name: … ozo-helper
✔ Select a framework: › Vue
✔ Select a variant: › TypeScript

Scaffolding project in /Users/patryk.antkiewicz/workspace/ozo-helper...

Done.
Then I added some yarn dependencies:
# Pinia - for state management in Vue 3
yarn add pinia
yarn add pinia-plugin-persistedstate

# CSS related packages (I used TailwindCSS for styling)
yarn add tailwindcss -D
yarn add autoprefixer -D
yarn add postcss -D

# CrxJS Plugin to use local development server with auto-reload on source change
yarn add @crxjs/vite-plugin -D
In root directory I created manifest.json file which contains the actual definition of the Chrome extension (detailed documentation can be found here
{
  "manifest_version": 3,
  "name": "OzoHelper",
  "description": "Ozo Helper",
  "version": "1.0.0",
  "action": {
    "default_popup": "index.html"
  },
  "content_scripts": [
    {
      "matches": ["<all_urls>"],
      "js": ["content.js"]
    }
  ],
  "permissions": ["storage", "activeTab", "scripting"]
}
- name -> name of our plugin that will be displayed in Chrome Extensions
- action -> default_popup specifies the HTML file that should be rendered in the extension popup - it will contain the Vue application with components that manage our 'favorite' tasks
- content_scripts -> specifies the script that will receive messages from Popup and interact with DOM of the active Chrome tab (inject the tasks into OZO input form)
- permissions - we need to grant some permissions for the extension: storage for saving the data in ActiveStorage, activeTab and scripting to allow reading and modifying the content of Active tab using Javascript
index.html and content.js do not exist at this point, I will create them later.
Finally I adjusted the Vite configuration (vite.config.ts in root directory) to use crx and handle @ prefix for imports.
import { defineConfig } from 'vite'
import vue from '@vitejs/plugin-vue'
import { crx } from '@crxjs/vite-plugin'
import manifest from './manifest.json'
import path from 'path'

export default defineConfig({
  plugins: [vue(), crx({ manifest })],
  resolve: {
    alias: {
      '@': path.resolve(__dirname, './src'),
    },
  }
})
With that the initial setup is ready, so let's proceed with actual implementation.
Vue application setup
Let's start with the Vue app definition (src/main.ts file)
import { createApp } from 'vue'
import App from './App.vue'
import './index.css'
import { createPinia } from 'pinia'
import piniaPluginPersistedstate from 'pinia-plugin-persistedstate'

const pinia = createPinia()
pinia.use(piniaPluginPersistedstate)

const app = createApp(App)

app.use(pinia)
app.mount('#app')
It is standard setup using Pinia plugin for storage. index.css is a global stylesheet that I wanted to be available in all components, the file is not generated on project creation, so I added it in src directory:
@tailwind base;
@tailwind components;
@tailwind utilities;

body {
    width: 600px;
    height: 300px;
}
It imports TailwindCSS components so that they are available globally and defines popup size.
I also added the index.html in root directory - it will render our Vue app in the Chrome Extension popup:
<!DOCTYPE html>
<html lang="en">
  <head>
    <meta charset="UTF-8" />
  </head>
  <body>
    <div id="app"></div>
    <script type="module" src="/src/main.ts"></script>
  </body>
</html>
Create Pinia store
Pinia is the most popular plugin for handling data stores in Vue.js 3, similar to VueEX but with some improvements. Defining a new store is very simple - I created src/stores directory containing tasks.js file:
import { defineStore } from 'pinia'

export const useTasksStore = defineStore('ozoTasks', {
  state: () => ({
    /** @type {{ id: number, code: string, time: string, description: string }[]} */
    tasks: [],
    nextId: 0,
  }),
  getters: {
    allTasks(state) {
      return state.tasks
    },
  },
  actions: {
    addTask(code, time, description) {
      this.tasks.push({ id: this.nextId++, code: code, time: time, description: description })
    },
    deleteTask(id) {
      const task = this.tasks.find(obj => {
        return obj.id === id
      })

      this.tasks.splice(this.tasks.indexOf(task), 1)
    }
  },
  persist: true
})
The store consists of a list of tasks which are simple Javascript objects containing id, code, time and description attributes, and nextId counter that will be used to generate ids for new records. There is one getter that returns all tasks, and operations to add and remove tasks. Important part is the persist: true at the end - it tells Pinia to use the pinia-plugin-persistedstate plugin and allow entered data to be persisted even after we close the browser (otherwise all data will disappear whenever we close the app). By default it uses local storage, but can be configured to use session as well.
Create main component
Next let's take a look at the main Vue component. The src/App.vue file with some dummy content was created automatically during project creation with Vite, so I replaced the content with the following:
<script setup lang="ts">
  import { useTasksStore } from '@/stores/tasks'
  import Task from '@/components/Task.vue'
  import NewTask from '@/components/NewTask.vue'

  const tasksStore = useTasksStore()
</script>

<template>
  <div class="grid grid-cols-1 divide-y">
    <div>
      <p v-if="tasksStore.allTasks.length === 0" class="p-3">There are currently no tasks defined</p>
      <table v-else class="tasks-table">
        <thead class="tasks-table-header">
          <tr>
            <th scope="col" class="tasks-table-header-col">Task Code</th>
            <th scope="col" class="tasks-table-header-col">Time</th>
            <th scope="col" class="tasks-table-header-col">Description</th>
            <th scope="col" class="tasks-table-header-col"></th>
          </tr>
        </thead>
        <tbody class="text-center">
          <Task v-for="task in tasksStore.allTasks" :key="task.id" :task="task" />
        </tbody>
      </table>
    </div>
    <div class="m-3">
      <NewTask />
    </div>
  </div>
</template>

<style scoped>
  .tasks-table {
    @apply w-full text-sm text-gray-500 dark:text-gray-400 table-auto
  }
  .tasks-table-header {
    @apply text-xs text-gray-700 uppercase bg-gray-50 dark:bg-gray-700 dark:text-gray-400
  }
  .tasks-table-header-col {
    @apply py-3
  }
</style>
>
It contains a single table, with rows corresponding to each Task in the Pinia store, and some basic styling. Existing Tasks (table rows) and NewTask form were implemented in separate components.
Let's take a look at the Task component:
<script setup lang="ts">
  import { useTasksStore } from '@/stores/tasks'

  interface Task {
    id: number
    code: string
    time: string
    description: string
  }

  const props = defineProps<{
    task: Task
  }>()

  const tasksStore = useTasksStore()

  const removeTask = () => {
    tasksStore.deleteTask(props.task.id);
  }

  const insertTask = () => {
    chrome.tabs.query({active: true, currentWindow: true}, (tabs) => {
      chrome.tabs.sendMessage(tabs[0].id, props.task)
    })
  }
</script>

<template>
  <tr>
    <td>{{ props.task.code }}</td>
    <td>{{ props.task.time }}</td>
    <td>{{ props.task.description }}</td>
    <td>
      <button class="btn btn-red" @click.stop.prevent="removeTask">X</button>
      <button class="btn btn-blue" @click.stop.prevent="insertTask">Insert</button>
    </td>

  </tr>
</template>

<style scoped>
  .btn {
    @apply text-sm border-4 text-white py-1 px-2 rounded ml-4
  }
  .btn-blue {
    @apply bg-blue-500 hover:bg-blue-700 border-blue-500 hover:border-blue-700
  }
  .btn-red {
    @apply bg-red-500 hover:bg-red-700 border-red-500 hover:border-red-700
  }
</style>
It contains the definition of Task interface which is accepted as prop, corresponding to the data format that is saved in the Pinia store. Template contains single table row, displaying the data and buttons for manipulation. The key part of the component are the removeTask and insertTask actions:
- removeTask simply calls the delete action from Pinia store
- insertTask is is more interesting, since it is where the whole interaction with DOM begins: it queries the active browser tab, and sends it a message containing the Task to be inserted. It is possible thanks to the permissions for accessing activeTab that we declared in Manifest file. We will see how this message is processed in later chapter.
To conclude the Vue part, let's see the NewTask component:
<script setup lang="ts">
  import { ref } from 'vue';
  import { useTasksStore } from '@/stores/tasks'

  const tasksStore = useTasksStore()

  const code = ref(null);
  const time = ref(null)
  const description = ref(null);

  const addTask = () => {
    tasksStore.addTask(code.value, time.value, description.value);
  }
</script>

<template>
  <h1 class="heading">New task</h1>
  <form class="w-full max-w-lg">
    <input v-model="code" class="form-input w-1/5" type="text" placeholder="Task ID">
    <input v-model="time" class="form-input w-1/5" type="text" placeholder="Time">
    <input v-model="description" class="form-input w-1/3" type="text" placeholder="Description">
    <button @click.stop.prevent="addTask" class="button">Add</button>
  </form>
</template>

<style scoped>
  .heading {
    @apply m-3 text-lg font-semibold text-left
  }
  .form-input {
    @apply bg-gray-200 text-gray-700 border border-gray-200 rounded py-3 px-4 ml-4
  }
  .button {
    @apply bg-teal-500 hover:bg-teal-700 border-teal-500 hover:border-teal-700 text-sm border-4 text-white py-1 px-2 rounded ml-4
  }
</style>
It is pretty straightforward - defines a simple form, which calls the addTask action from Pinia store when the button is clicked.
Interacting with the Active Tab DOM
The key part of the project is the content.js script, which was declared in the Manifest file. Thanks to specified permissions, It has the access to Active Tab DOM, so it is here where the manipulation logic is implemented. I created the file in project root directory with the following content:
chrome.runtime.onMessage.addListener(function(task) {
  const rows = document.getElementById('tbody_01').querySelectorAll('tr');

  const isRowEmpty = (row) => {
    const projectInput = row.querySelector('input.Width96');
    return projectInput.value === null || projectInput.value === "";
  }

  const rowToInsert = Array.from(rows).find(row => isRowEmpty(row));

  if(rowToInsert) {
    const projectInput = rowToInsert.querySelector('input.Width96');
    projectInput.value = "0001";
    projectInput.dispatchEvent(new Event('change'));

    const codeInput = rowToInsert.querySelector('input.workitems-code');
    codeInput.value = task.code;

    const timeInput = rowToInsert.querySelector('input[name=db_WORK_TIME]');
    timeInput.value = task.time;

    const descriptionInput = rowToInsert.querySelector('input.workitems-note');
    descriptionInput.value = task.description;

    setTimeout(() => {
      codeInput.dispatchEvent(new Event('change'));
      timeInput.dispatchEvent(new Event('blur'));
    }, 1000);

  } else {
    alert('All rows are filled, add new one and try again!')
  }
});
The whole logic is included in onMessage listener, which reacts to the messages that are being sent inside insertTask method of Task.vue component. The handler method receives the Task object to be inserted as input parameter. Script locates first empty row inside the OZO Input form and sets all necessary input fields. I determined the selectors of DOM elements by analyzing page's HTML content using Chrome Developer Tools. During tests I noticed that the the scripts that recalculate total work time, project names etc are triggered by specific Javascript events, and there are dependencies between fields (cannot input Task code until Project Name is calculated basing on Project code) the code needed some adjustments: since events like blur are not triggered when input value is set directly from from Javascript, I had to trigger them manually, and also introduce some timeouts to make sure that Project Name is calculated before entering Task Code and Time.
Testing the plugin
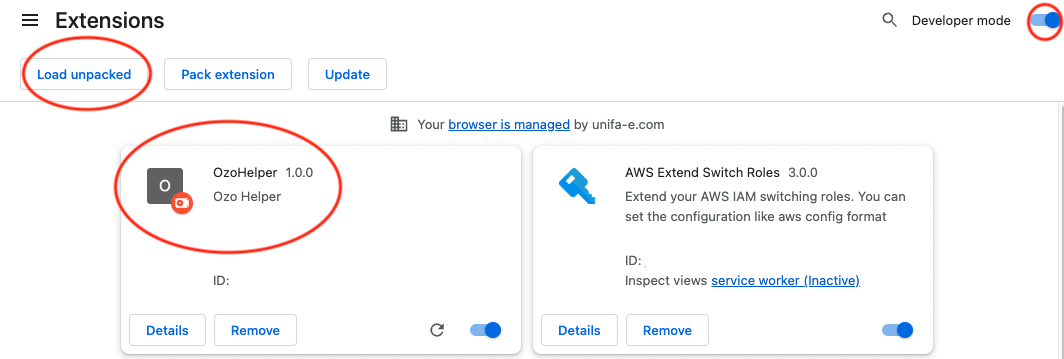
In order to test the plugin in Chrome we need to do the following:
- Go to chrome://extensions/ and check the Developer mode option in top-right corner
- Click Load unpacked in top-left corner and choose the dist directory of our project
- Extension should be added to the list and ready to use
With project configured as I described so far (using crx) and running, we just need to type
$ vite
in command line, and the development server will be started. Any changes done in the source code will be immediately reflected in the browser, which makes the development very convenient.
Sharing the plugin with others
To share locally developed plugin with others, it needs to be built by executing the following command:
$ vite build
Then we can zip the dist directory of our project and share it - the import procedure is the same as described in previous section.
Summary
Using Vite and Vue.js we can quickly built Chrome extension that can interact with any website's DOM and allow us to customize it to our needs, to make our user experience better. When we have some website with not very convenient or too complex GUI, we can 'replace' it with our own, simplified 'overlay'. The example presented here was just a simple tool to fill the form, but of course it gives us much wider possibilities.