こんにちは、プロダクトエンジニアリング部のちょうです。天気もすっかり春になった気分ですね。気温がさむくなったり暖かくなったりするので体調管理を十分気をつけましょう。
さて、コンテナ技術の流行りとともに、AWS ECSなどを利用して機能を提供するサービスが増えたと思います。ただ、EC2インスタンスからECS serviceに変わる際に、実際インフラレベルの内容が複雑になることが多く、いままでできたことをどうやってECSで実現できるかを調べないといけないです。その一つはサーバーに入って、調査したり、作業したりすることです。
ECSにはEC2とFargate二種類があります。EC2は名前通りEC2インスタンスです。既存のEC2インスタンスを再利用できます。特にSpot instanceなどです。Fargateはまったくインスタンスを管理しなくてもいいタイプです。EC2タイプはインスタンスがあるので、そのインスタンスに入って、ローカルと同じようにdockerのコマンドを使えば実行中のECS serviceにアクセスできます。Fargateになると、インスタンスがないので、簡単で入ることができません。
先月AWSからECS serviceにdocker execを実行できるニュースがあります。
Amazon ECS で、Amazon EC2 または AWS Fargate で実行されているコンテナでのコマンドの実行が可能に
いろいろ設定を変えれば、Fargateでも入れるようになります。先日弊社のブログにも書きました。
Amazon ECS Execを使ってrails consoleを動かしてみる - ユニファ開発者ブログ
でも、よく考えると、実行中のECS serviceに、docker execで入って、調査はまだいいですが、作業はやめたほうがいいかもしれません。実行中のサービスに影響があります。それと、Fargateを使ってインスタンスを管理しなくてもいい反面、ディスクのサイズは固定、プログラムが終わると消えるデメリットがあります。正直本番作業に向いていないです。いろいろ設定して、作業用に変えるより、素直にEC2タイプを使いましょう。
EC2タイプでしたら、AWS CloudFormationを使って一瞬まとめて作ることができます。おまけに、EC2インスタンスの種類などいろいろ指定できます。Terraformでも管理できますが、こういう一時的にリソースを作ってあとで消す作業はCloudFormationが向いています。
実際のCloudFormation定義を見ると、入力パラメータ
AWSTemplateFormatVersion: "2010-09-09"
Description: ECS EC2

Parameters:
  ImageUrl:
    Type: String
    Description: "Full image url"
  VpcId:
    Type: AWS::EC2::VPC::Id
    Description: "VPC to place EC2 and other resources"
  PrivateSubnet1:
    Type: AWS::EC2::Subnet::Id
    Description: "Private subnet to place EC2 and other resources"
  InstanceType:
    Description: "EC2 instance type"
    Type: String
    Default: t2.micro
    AllowedValues:
      - t2.micro
      - t2.small
      - t2.medium
      - t2.large
      - m3.medium
      - m3.large
      - m3.xlarge
      - m3.2xlarge
      - m4.large
      - m4.xlarge
      - m4.2xlarge
      - m4.4xlarge
      - m4.10xlarge
      - c4.large
      - c4.xlarge
      - c4.2xlarge
      - c4.4xlarge
      - c4.8xlarge
      - c3.large
      - c3.xlarge
      - c3.2xlarge
      - c3.4xlarge
      - c3.8xlarge
      - r3.large
      - r3.xlarge
      - r3.2xlarge
      - r3.4xlarge
      - r3.8xlarge
      - i2.xlarge
      - i2.2xlarge
      - i2.4xlarge
      - i2.8xlarge
    ConstraintDescription: "Please choose a valid instance type."
  TaskCpu:
    Type: Number
    Description: "CPU resource for the task, 1024 = 1vCPU"
    Default: 256
    AllowedValues:
      - 256
      - 512
      - 1024
      - 2048
      - 4096
  TaskMemory:
    Type: Number
    Description: "Memory for the task, 512 = 0.5GB"
    Default: 512
    AllowedValues:
      - 512
      - 1024
      - 2048
      - 4096
      - 8192
      - 16384
      - 30720
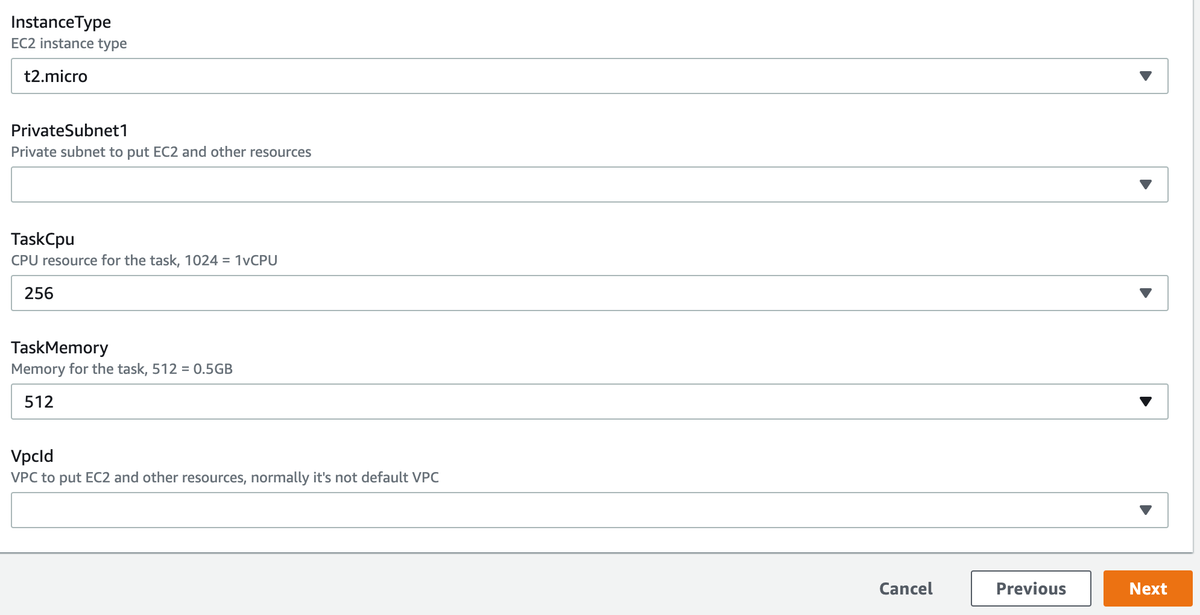
状況に応じてCPUやメモリを指定できます。実際の画面はこうなります。

次はEC2インスタンスの設定です。
Resources:
  EcsInstanceRole:
    Type: "AWS::IAM::Role"
    Properties:
      RoleName: "ecsInstanceRole"
      AssumeRolePolicyDocument:
        Version: "2012-10-17"
        Statement:
          - Effect: "Allow"
            Principal:
              Service:
                - "ec2.amazonaws.com"
            Action:
              - "sts:AssumeRole"
      ManagedPolicyArns:
        - "arn:aws:iam::aws:policy/service-role/AmazonEC2ContainerServiceforEC2Role"
        - "arn:aws:iam::aws:policy/AmazonSSMManagedInstanceCore"

  IamInstanceProfile:
    Type: "AWS::IAM::InstanceProfile"
    Properties:
      InstanceProfileName: "EcsInstance"
      Roles:
        - !Ref EcsInstanceRole

  EcsInstanceSecurityGroup:
    Type: "AWS::EC2::SecurityGroup"
    Properties:
      GroupName: ecs-ec2
      GroupDescription: "ecs ec2"
      VpcId: !Ref VpcId
      Tags:
        - Key: Name
          Value: ecs-ec2

  EcsInstance:
    Type: "AWS::EC2::Instance"
    CreationPolicy:
      ResourceSignal:
        Timeout: PT5M
    Properties:
      # https://docs.aws.amazon.com/AmazonECS/latest/developerguide/ecs-optimized_AMI.html
      # AWS ECS optimized AMI for ap-northeast-1(Tokyo)
      # https://ap-northeast-1.console.aws.amazon.com/systems-manager/parameters/aws/service/ecs/optimized-ami/amazon-linux-2/recommended/image_id/description?region=ap-northeast-1#
      ImageId: "ami-08aba6714243b1bf9"
      InstanceType: !Ref InstanceType
      IamInstanceProfile: !Ref IamInstanceProfile
      SubnetId: !Ref PrivateSubnet1
      SecurityGroupIds:
        - !Ref EcsInstanceSecurityGroup
      UserData:
        Fn::Base64: !Sub |
          #!/bin/bash -xe
          echo ECS_CLUSTER=my-cluster >> /etc/ecs/ecs.config
          yum install -y aws-cfn-bootstrap
          /opt/aws/bin/cfn-signal -e $? --stack ${AWS::StackName} --resource EcsInstance --region ${AWS::Region}
      Tags:
        - Key: Name
          Value: ecs-ec2
ECS用のEC2インスタンスを作るには、ECS用のImageを指定するほか、ecs.configにクラスターの名前を指定する必要があります。最後はTaskDefinitionとECS Serviceです。
  TaskDefinition:
    Type: "AWS::ECS::TaskDefinition"
    Properties:
      Family: my-console
      Cpu: !Ref TaskCpu
      Memory: !Ref TaskMemory
      NetworkMode: "awsvpc"
      RequiresCompatibilities:
        - "EC2"
        - "FARGATE"
      ExecutionRoleArn: !ImportValue "EcsExecutionRoleArn"
      ContainerDefinitions:
        - Name: "console"
          Image: !Ref ImageUrl
          Essential: true
          # https://stackoverflow.com/questions/2935183/bash-infinite-sleep-infinite-blocking
          Command:
            - /bin/sh
            - -c
            - "while true; do sleep 3600; done"
          # ...

  EcsServiceSecurityGroup:
    Type: "AWS::EC2::SecurityGroup"
    Properties:
      GroupName: ecs-service-ec2
      GroupDescription: "ecs service on ec2"
      VpcId: !Ref VpcId
      SecurityGroupIngress:
        - SourceSecurityGroupId: !Ref EcsInstanceSecurityGroup
          SourceSecurityGroupOwnerId: !Ref AWS::AccountId
          IpProtocol: -1
      Tags:
        - Key: Name
          Value: ecs-service-ec2

  EcsServiceAPI:
    Type: "AWS::ECS::Service"
    DependsOn:
      - EcsInstance
    Properties:
      Cluster: my-cluster
      ServiceName: my-console
      DeploymentController:
        Type: "ECS" # rolling update
      DeploymentConfiguration:
        DeploymentCircuitBreaker:
          Enable: true
          Rollback: true
      LaunchType: "EC2"
      TaskDefinition: !Ref TaskDefinition
      NetworkConfiguration:
        AwsvpcConfiguration:
          AssignPublicIp: "DISABLED"
          SecurityGroups:
            - !Ref EcsServiceSecurityGroup
          Subnets:
            - !Ref PrivateSubnet1
      SchedulingStrategy: "REPLICA"
ECS Clusterは基本事前に作っていたので、ここで名前が一致すればいいです。作業用のTaskDefinitionは基本サービスと違います。自由で設定できればそれは一番いいですよね。そしてECS serviceにload balancerやservice registry一切ないのもすっきりですよね。
このCloudFormation設定を利用して、関連リソースを作れば、AWS System ManagerからEC2インスタンスにアクセスできれば、実行中のECS serviceにもアクセスできます。そしてEC2にいると、いろいろ作業しやすいです。
最後に、AWSが新しく発表したecs execですが、用途に応じて使うのがいいでしょう。例えば、調査や簡単な作業などです。長時間の作業や負荷をかける作業でしたら使わないほうがいいと思います。逆にEC2タイプとCloudFormationを利用して、簡単でスムーズに本番作業を対応できます。ぜひ使ってみましょう。
ちなみにユニファでは一緒に働く仲間を募集しています!よかったらこちらのページもご覧ください。