By Matthew Millar R&D Scientist at ユニファ
Purpose:
This is part IV of the MAG (Multi-Model Attribute Generator) paper I am working on. This post will start to look at the clothing color of the upper body and the lower body with different models for each (but, with the same architecture). So, for a recap of the previous post, we have completed a gender identifier Multi-Model Attribute Generator - ユニファ開発者ブログ
We have created both upper and lower body clothing classifiers
MAG part II - ユニファ開発者ブログ
MAG Part III Upper Body - ユニファ開発者ブログ
And now we are turning to color descriptors. The color that will be looked at is the primary colors of; Red, White, Yellow, Green, Purple, Blue, and Black for the upper body. The primary colors for the lower body will be; Brown, Red, White, Yellow, Green, Grey, Blue, and Black.
These colors were chosen as they are the primary colors that appeared on the upper and lower bodies of most people in the dataset. These selected colors are by far not a full representation of every possible color possible but are a good sample of many people. Some colors like pink and teal are rolled into red and blue respectively. This was done as there were not enough images with teal or pink in the dataset to make a whole new class. There should be a set of 400 or more images to make a class which was the cut off number for each color.
Color Model Architecture:
Seeing that the goal of the product is not necessarily an object identification but a color I turned to the literature to give me good architecture. I copied a similar architecture to the paper Vehicle Color Recognition using Convolutional Neural Network (Rachmadi & Purnama, 2015) https://arxiv.org/abs/1510.07391. This paper performed well, and the architecture does well for classifying color. Choosing a different architecture from my previous post was necessary as I was trying to get color rather than features from each image. So, the use of a fine turned Xeception model or ResNet50 model would not be ideal in this situation. This is the reason why I chose to create another model from scratch and not extend or fine-tune a pre-trained model.
CNN Setup:
The CNN for this model consists of two networks. Each of these base networks has 8 layers. The basic conv block is a convolutional layer followed by a normalization and pooling layers. Then the use of Relu as an activation for each layer is used. There are 5 different convolutional layers in the base network. For more information about the network see the above-mentioned paper. I will not go into the details of the model as the paper describes it very well.
This is the code for the CNN architecture. It looks more complicated than the previous post, but this is because of it not using a pre-trained model for the backbone.
def net(num_classes):

    input_image = Input(shape=(224,224,3))
    x = Convolution2D(filters=48,kernel_size=(11,11),strides=(4,4),
                              input_shape=(224,224,3),activation='relu')(input_image)
    top_x_1 = BatchNormalization()(top_x_1)
    top_x_1 = MaxPooling2D(pool_size=(3,3),strides=(2,2))(top_x_1)
    top_x_2 = Lambda(lambda x : x[:,:,:,:24])(top_x_1)
    bot_x_2 = Lambda(lambda x : x[:,:,:,24:])(top_x_1)

    top_x_2 = Convolution2D(filters=64,kernel_size=(3,3),strides=(1,1),activation='relu',padding='same')(top_x_2)
    top_x_2 = BatchNormalization()(top_x_2)
    top_x_2 = MaxPooling2D(pool_size=(3,3),strides=(2,2))(top_x_2)

    bot_x_2 = Convolution2D(filters=64,kernel_size=(3,3),strides=(1,1),activation='relu',padding='same')(bot_x_2)
    bot_x_2 = BatchNormalization()(bot_x_2)
    bot_x_2 = MaxPooling2D(pool_size=(3,3),strides=(2,2))(bot_x_2)
    top_x_3 = Concatenate()([top_x_2,bot_x_2])
    top_x_3 = Convolution2D(filters=192,kernel_size=(3,3),strides=(1,1),activation='relu',padding='same')(top_x_3)

    top_x_4 = Lambda(lambda x : x[:,:,:,:96])(top_x_3)
    bot_x_4 = Lambda(lambda x : x[:,:,:,96:])(top_x_3)

    top_x_4 = Convolution2D(filters=96,kernel_size=(3,3),strides=(1,1),activation='relu',padding='same')(top_x_4)
    bot_x_4 = Convolution2D(filters=96,kernel_size=(3,3),strides=(1,1),activation='relu',padding='same')(bot_x_4)

    top_x_5 = Convolution2D(filters=64,kernel_size=(3,3),strides=(1,1),activation='relu',padding='same')(top_x_4)
    top_x_5 = MaxPooling2D(pool_size=(3,3),strides=(2,2))(top_x_5)

    bot_x_5 = Convolution2D(filters=64,kernel_size=(3,3),strides=(1,1),activation='relu',padding='same')(bot_x_4)
    bot_x_5 = MaxPooling2D(pool_size=(3,3),strides=(2,2))(bot_x_5)

    bottom_x_1 = Convolution2D(filters=48,kernel_size=(11,11),strides=(4,4),
                              input_shape=(227,227,3),activation='relu')(input_image)
    bottom_x_1 = BatchNormalization()(bottom_x_1)
    bottom_x_1 = MaxPooling2D(pool_size=(3,3),strides=(2,2))(bottom_x_1)

    bottom_x_2 = Lambda(lambda x : x[:,:,:,:24])(bottom_x_1)
    bottom_bot_x_2 = Lambda(lambda x : x[:,:,:,24:])(bottom_x_1)

    bottom_x_2 = Convolution2D(filters=64,kernel_size=(3,3),strides=(1,1),activation='relu',padding='same')(bottom_x_2)
    bottom_x_2 = BatchNormalization()(bottom_x_2)
    bottom_x_2 = MaxPooling2D(pool_size=(3,3),strides=(2,2))(bottom_x_2)

    bottom_bot_x_2 = Convolution2D(filters=64,kernel_size=(3,3),strides=(1,1),activation='relu',padding='same')(bottom_bot_x_2)
    bottom_bot_x_2 = BatchNormalization()(bottom_bot_x_2)
    bottom_bot_x_2 = MaxPooling2D(pool_size=(3,3),strides=(2,2))(bottom_bot_x_2)

    bottom_x_3 = Concatenate()([bottom_x_2,bottom_bot_x_2])
    bottom_x_3 = Convolution2D(filters=192,kernel_size=(3,3),strides=(1,1),activation='relu',padding='same')(bottom_x_3)

    bottom_x_4 = Lambda(lambda x : x[:,:,:,:96])(bottom_x_3)
    bottom_bot_x_4 = Lambda(lambda x : x[:,:,:,96:])(bottom_x_3)

    bottom_x_4 = Convolution2D(filters=96,kernel_size=(3,3),strides=(1,1),activation='relu',padding='same')(bottom_x_4)
    bottom_bot_x_4 = Convolution2D(filters=96,kernel_size=(3,3),strides=(1,1),activation='relu',padding='same')(bottom_bot_x_4)

    bottom_x_5 = Convolution2D(filters=64,kernel_size=(3,3),strides=(1,1),activation='relu',padding='same')(bottom_x_4)
    bottom_x_5 = MaxPooling2D(pool_size=(3,3),strides=(2,2))(bottom_x_5)

    bottom_bot_x_5 = Convolution2D(filters=64,kernel_size=(3,3),strides=(1,1),activation='relu',padding='same')(bottom_bot_x_4)
    bottom_bot_x_5 = MaxPooling2D(pool_size=(3,3),strides=(2,2))(bottom_bot_x_5)

    output_x = Concatenate()([top_x_5,bot_x_5,bottom_x_5,bottom_bot_x_5])

    flatten = Flatten()(output_x)

    # Fully-connected layer
    FC_1 = Dense(units=4096, activation='relu')(flatten)
    FC_1 = Dropout(0.6)(FC_1)
    FC_2 = Dense(units=4096, activation='relu')(FC_1)
    FC_2 = Dropout(0.6)(FC_2)
    output = Dense(units=num_classes, activation='softmax')(FC_2)

    model = Model(inputs=input_image,outputs=output)
    sgd = SGD(lr=1e-3, decay=1e-6, momentum=0.9, nesterov=True)
    model.compile(optimizer=sgd, loss='categorical_crossentropy', metrics=['accuracy'])

    return model
This is followed by the Image generators for the training and validation sets. Nothing we have not seen before
train_datagen = ImageDataGenerator( rescale=1./255,
                                   shear_range=0.2,
                                   zoom_range=0.3,
                                   horizontal_flip=True,
                                   validation_split=0.20) # set validation split

train_generator = train_datagen.flow_from_directory(
    Data_Dir,
    target_size = (224, 224),
    shuffle=True,
    batch_size=BATCH_SIZE,
    class_mode='categorical',
    subset='training') # set as training data

validation_generator = train_datagen.flow_from_directory(
    Data_Dir, # same directory as training data
    target_size = (224, 224),
    batch_size=BATCH_SIZE,
    shuffle= False,
    class_mode='categorical',
    subset='validation') # set as validation data
And then the fitting and testing of the model:
history = model.fit_generator(
    train_generator,
    steps_per_epoch = train_generator.samples//BATCH_SIZE,
    validation_data = validation_generator,
    validation_steps = validation_generator.samples//BATCH_SIZE,
    epochs = EPOCHS,
    verbose=1,
    callbacks=callbacks_list)
Upper Color Results:
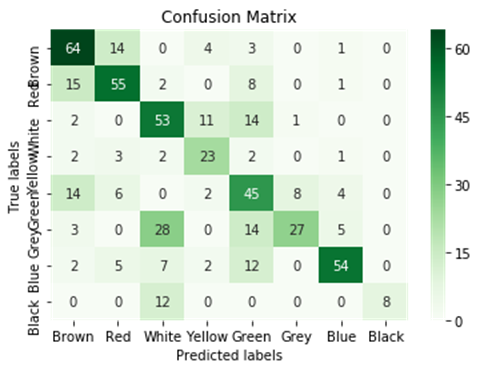
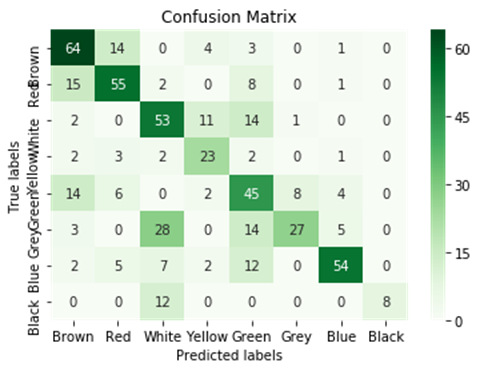
The results are very results are fairly good here. Looking at the confusion metrics, most of the images are classified correctly. The two colors with the biggest issue are white as it seems to be predicted as red and yellow, and black. This might be due to striped shirts, images that are blurry, or images that are not centered on the shirt and have a lot of background in them. White might just be close enough to pink and lime green to be classified as those colors.
Classification Report
              precision    recall  f1-score   support

       Brown       0.63      0.74      0.68        86
         Red       0.66      0.68      0.67        81
       White       0.51      0.65      0.57        81
      Yellow       0.55      0.70      0.61        33
       Green       0.46      0.57      0.51        79
        Grey       0.75      0.35      0.48        77
        Blue       0.82      0.66      0.73        82
       Black       1.00      0.40      0.57        20

    accuracy                           0.61       539
   macro avg       0.67      0.59      0.60       539
weighted avg       0.65      0.61      0.61       539

Lower Color Results:
For the lower body, the results were ok. This might be due to many people wearing shorts and the existence of bags or the background changing dramatically in several of the photos. This could result in a loss of accuracy and recall for each color. Black and grey seem to be the hardest colors for the model to detect and classify correctly. This makes me think that the background is a larger problem for the lower body parts. Grey got miss classified as green and white mostly. The largest question is why black is missing classified as white. This I feel is related mostly to people wearing shorts in the dataset or white/black shirts that overlap in the image.
Classification Report
              precision    recall  f1-score   support

       Brown       0.63      0.74      0.68        86
         Red       0.66      0.68      0.67        81
       White       0.51      0.65      0.57        81
      Yellow       0.55      0.70      0.61        33
       Green       0.46      0.57      0.51        79
        Grey       0.75      0.35      0.48        77
        Blue       0.82      0.66      0.73        82
       Black       1.00      0.40      0.57        20

    accuracy                           0.61       539
   macro avg       0.67      0.59      0.60       539
weighted avg       0.65      0.61      0.61       539

Conclusion:
So, this different CNN architecture does work quite well for color extraction. I will have to go back to the model and fine-tune the data and the model to try to rise the recall rate on white and black, but for the rest of the colors, the results are fine. This current architecture will work fine for the lower body color as there are fewer colors and won't have many shades or hues.
References:
Rachmadi, R. F., Purnama, K. E., (2015) Vehicle Color Recognition using Convolutional Neural Network arXiv:1510.07391 [cs.CV]